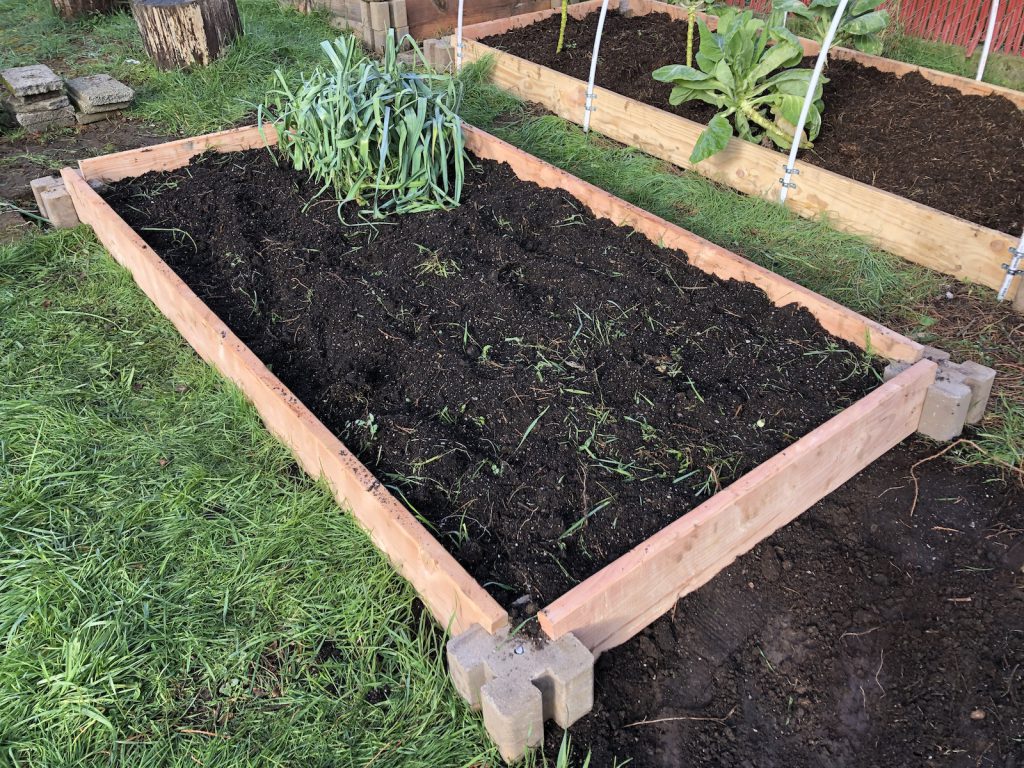
Over the past few years, my approach to setting up a raised garden beds has evolved quite a bit. The following is my cheapest, easiest, and most effective design to date. You can buy all the parts for $65 (or less) and complete the entire project in less than two hours.
Time
The overall time will depend on your travel time to the hardware store. Budget 45 minutes to gather all the parts at the store. Budget an hour for assembly when you get home. You can probably half both of these times if you hustle.
Tools
One of my favorite things about this raised bed is that it requires very few tools. You will need any kind of wood saw to make a single 8-inch cut. A hand saw or electric circular saw will work perfectly. Just about anything that cuts wood will get this done. Or, keep in mind that the big stores like Lowe’s or Home Depot will cut the wood for you for free.
The only other tool you need is something heavy enough to drive stakes into the ground. Any large hammer or maul will work great. But a heavy pipe or even a big rock will work in a pinch.
Ingredients
I bought all of the following ingredients on one trip to a Lowe’s. Whenever possible, I prefer to support my local neighborhood hardware store but they don’t stock dimensional lumber, etc. The total price for one 8ft by 4ft raised bed was $65. I was in a hurry, but if you take extra time to shop around for bargains you can probably find the parts for even cheaper.
(3) 8-foot 2in by 8in boards
These will be the walls of the bed. I paid $14.85 for each. Don’t buy pressure treated wood if you are growing vegetables to eat because it’s toxic and the chemicals can leach into the soil. One of these three boards will eventually be cut in half to make two 4-foot boards. If you don’t own a saw, or if you’re just feeling lazy, many hardware stores will make this cut for you. If they sell 2x8s in 4-foot lengths, you could also buy two of these (instead of one of the 8-footers).
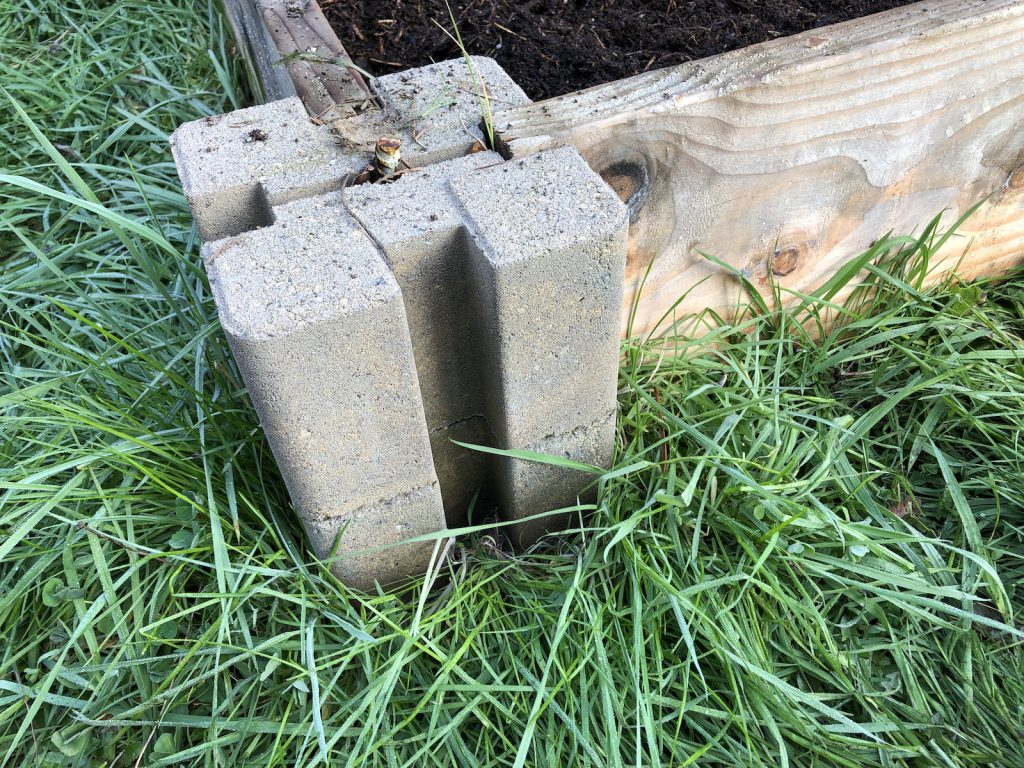
(4) “Planter wall blocks“
It’s a clunky name, but these are basically just square cinder blocks with vertical grooves that fit planks of wood. They will be the corners of the bed. I paid $2.98 for each.
(4) 4-foot steel rebar rods
These will be the stake that hold the corners in place. I used 1/2in, but the diameter doesn’t matter much, as long as it fits in side the hole in the center of the corner blocks. I paid $2.28 for each piece. You can probably save a couple dollars if you buy a larger rod and cut it down yourself. Of just improvise with some old pipe if you have something similar lying around.
Assembly
- If you brought home three 8-foot boards, start by cutting one of them in half. Now you have two 8-foot boards and two 4-foot boards.
- Next, place the corner blocks wherever you want to corners of the bed.
- Insert the boards into the grooves of the corner blocks. Pick any side an work your way around. If the ground isn’t level, you might notice a seesaw effect in which the board won’t sit flush on both ends because the ground is raised somewhere in the middle. Scrape or dig out the high spots until all ends of the boards sit evenly in the corner blocks.
- Drop one piece of rebar into any one of the corners and hammer it down until it’s level with the top of the corner block.
- Go to the opposite corner and repeat the previous step, but first take a moment to snug the corner block so that the groves are fitted tightly against the boards. (Sometimes they get shaken out of place.) Repeat for each remaining corner.
Optional upgrade
The first time I built a raised bed in this way, I used 2in by 10in boards, and I used two stacked blocks on each corner. This results in a deeper, sturdier frame. For me, this turned out to be overkill. I don’t need the the extra height of the sidewalls, and a single block on each corner is enough to keep things solid. On the other hand, I do prefer the way it looks because the two stacked corner blocks align nicely with the top of a 10-inch tall board.
Now what?
Congratulations. You now have a sturdy raised bed. The best way to prepare it for planting will depend entirely on where you are located and what you are planning to grow. If there is currently grass in the floor of the bed, you probably want to start by removing it with a shovel or a rake, and tilling that soil before filling in the bed with nice growing soil and/or compost. Soil and compost is another conversation, but last year’s fallen leaves and grass clippings are a great (and free) way to produce high quality compost.
Enjoy! If you try this, or if you have an even better system, let me know.